How to Install and Use Dialpad on an iPhone
1) Open the App Store and search “Dialpad”.
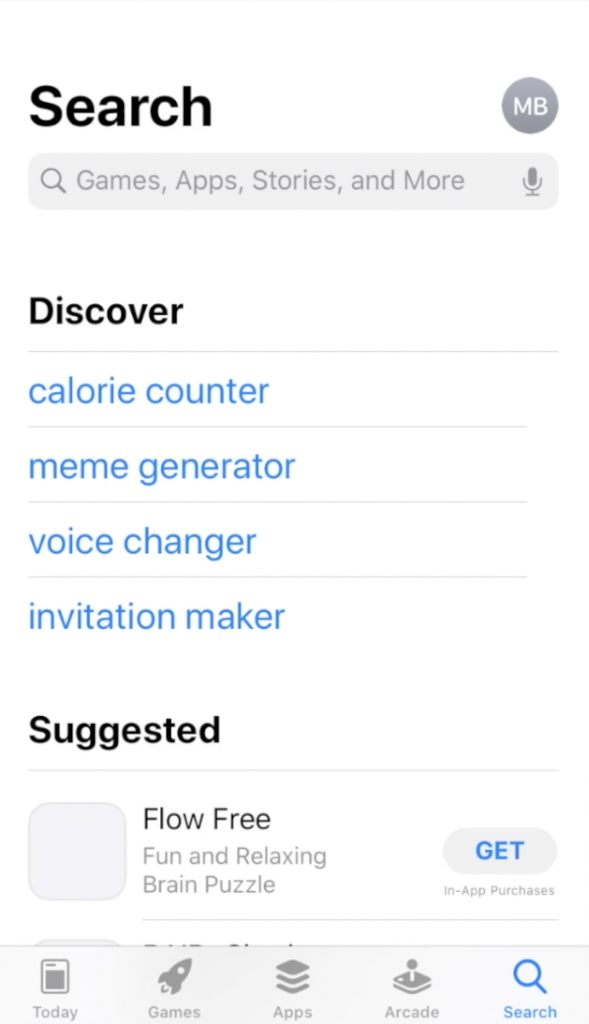
2) Download the Dialpad App.
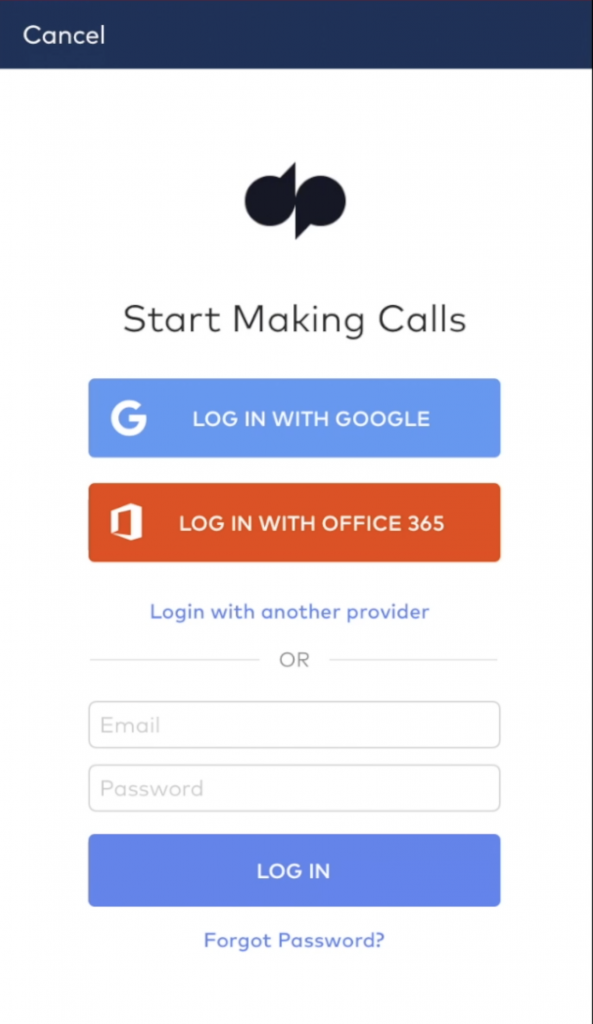
3) Once you open the App sign in with Google.
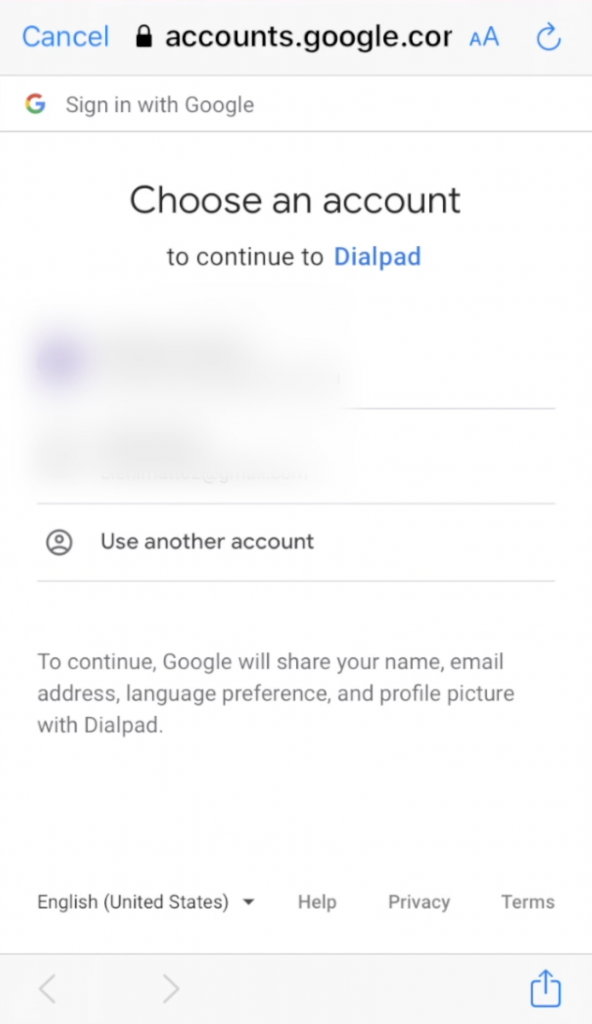
4) If you do not see your Daemen account select “Use Another Account”
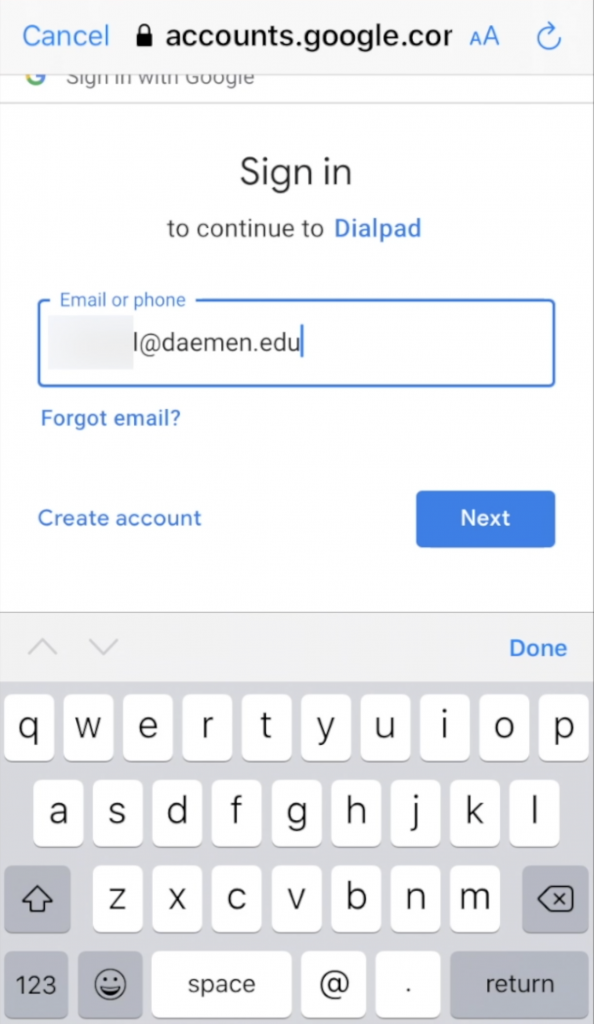
5) Sign in using your Daemen.edu email address.
Here is a video showing the steps in action!
The info below is from dialpad.com
(https://help.dialpad.com/hc/en-us/articles/115003360683-Getting-Started-with-the-iOS-App)
(https://help.dialpad.com/hc/en-us/articles/208823966-Use-the-iOS-App)
Getting Started with the iOS App
Step 1: Verify Your Number
Once you launch the app, you’ll be asked to verify your phone number. You may have already done this in your Profile settings. If so, once you hit Verify Number, we’ll let you know that you’re good to go onto the next step.

If not, we’ll ring out to you. Just tap 1 to confirm your number.
If you opt to Skip for now, you’ll only be able to place/receive calls when you have an internet connection.
Step 2: Navigating the App
Once you’re logged into the app, your Recent screen will display things like:
- Your Profile
- Your Favorite Contacts
- Recent conversations (including notifications)
- Quick action (+) menu (add contact, new message, new call)
- Search
- Inbox
- Contacts
- Assigned Departments / Call Centers

Inbox
Just like your desktop app, your Inbox displays:
- New notifications
- New calls
- Missed calls
- Voicemails
- Recordings
- Messages
- Flagged Items
- Spam

Tap on a voicemail to display options to:
- Play (via earpiece of your phone’s speaker)
- Reply (conversation thread)
- Call Back
- Delete

Note:
Pro or Enterprise user? Voicemail transcriptions will automatically appear under each of your voicemails.
Contacts
Tap on Contacts to view:
- Frequent
- Directory
- Department
- Dialpad (contacts you’ve connected with through Dialpad)
- Device (personal contacts from your iOS device)

Departments
Tap on Departments to display all the Departments that you’ve been assigned as an Operator or Administrator.
Your Department Inbox displays categories like:
- New – new interactions from a contact
- All – timeline of events to that department and shows weather the interactions were a message, call, or voicemail
- Missed notifications
- Voicemails
- Recordings (Administrators only)

You’ll also have the ability to toggle your Department DND from this screen.
Call Center
Tap on Call Centers to display all the Call Centers that you’ve been assigned as an Agent or Administrator.

Here you can manage your Available/Off Duty status and set any custom off duty status’.

Your Call Center Inbox Displays:
- Hold Queue
- Agents – shows all agents assigned to that Call Center and their status’ (Call Center Admins and Supervisors can toggle agents on and off duty)
- New – new interactions from a contact
- All – timeline of events to that department and shows weather the interactions were a message, call, or voicemail
- Voicemails
- Recordings (Call Center Admins ONLY)

Profile Settings
Here’s where you’ll come if you’re looking to:
- Set a Custom Status
- Toggle your DND on/off
- Change your outbound caller ID for all iOS calls
- Toggle notifications on/off
- Enable/disable HD calling

Step 3: Enabling HD Calling
Empowering you to work from anywhere takes strong call quality. That’s why we suggest enabling HD calling when you’re connected to a trusted, strong WiFi connection (like at the Office, airport, or even at home).

Traveling? Navigate back here to disable HD calling and make calls with your carrier network.
Better yet, consider opting for Choose before each call, giving you the flexibility to pick the best option for wherever work takes you.
Calling
Place a Call
To place a call in the iOS app, tap on the plus sign on your screen > New Call or tap on the phone icon in the upper right-hand corner in any contact.
For more information on how to place a call within the Dialpad app in our Make Your First call article here.
Receive a Call
To receive a call in the iOS app, tap on the blue “Accept” checkmark on the right side of the screen.
For more information on how to receive a call within the Dialpad app in our Receive Your First call article here.
Transfer a Call
To transfer a call follow the steps below:
- Tap More > Transfer Caller
- On your search screen, type in your recipient’s name or number
- Choose one of your available transfer options
For a more visual view of how to transfer a call in the iOS mobile app check out our Transfer Call article here.
Add a Caller
- Tap More > Add a Caller
- On your search screen, type in your recipient’s name or number
- Both you and your other caller will hear ringing
- Once the additional caller is connected, you’ll have the same active call options for either caller
Note:
You can add a max of 3 callers to your active call.
For a more visual view of how to add a caller in the iOS mobile app check out our Add a Caller article here.
Calls with iOS Dialer (Call Kit)
Place and receive calls with your native iOS dialer using your Dialpad number (i.e. a CallKit). Before reading on, make sure that you have upgraded to iOS 10.
Place a Call
- Navigate to your iOS Contacts > Choose a Contact
- Click on the Call icon
- Select Dialpad
- HD or Carrier Call is placed with your Dialpad # (depends on your Dialpad settings)

Keep the following in mind:
- This is your default option for native dialing unless you revert back
- Your call records will be stored in Dialpad
Receive a Call (Locked)
You can receive an HD call through your native dialer when your iOS device is locked.
- Inbound call displays on your iOS lock screen
- Inbound call will display Dialpad Audio and your Caller’s ID
- Answer the call then tap the Dialpad icon
- After unlocking your phone, you’ll be redirected to the Dialpad app

Receive a Call (Unlocked)
- Inbound call displays on your iOS device
- Inbound call will display Dialpad Audio and your caller’s ID
- Answer the call to be automatically pulled into your Dialpad app

In either case, you must enable HD calling inbound within your mobile Dialpad settings to use these options.
Call Waiting
When you’re on an active HD call and a second carrier call comes in, you’ll have the option to:
- Decline the carrier call
- End the HD call and accept the carrier call

When you’re on an active carrier call and a second HD call comes in, you’ll have the option to:
- End the carrier call and accept the HD call
- Reject the HD call
- Hold the carrier call and accept the HD call

Record a Call
- To record, Tap More > Record This Call
- To stop recording, tap More > Stop Recording

You can access your recordings straight from your iOS app. Just navigate to Inbox > Recordings. To download, head back over to your desktop app.
Manage Contacts
Search Contacts
You can search for either a contact or a specific term/phrase:
Search a Contact
- Tap the Search icon (magnifying glass) to pull up the search field
- Type in your contact’s name/number
- Tap on their name to pull up your conversation thread
Search a Term/Phrase
- Tap the Search icon (magnifying glass) to pull up the search field
- Tap on History, then type in your term/phrase
- Tap on a result to be pulled into your conversation

From the conversation thread, you can:
- Send a message
- View their Profile
- Place a Call
Add a Contact
- Tap + then Add Contact
- Enter in your contact’s info
- Tap Done to save contact info
You can also add unsaved numbers as new contacts. Just open up the conversation thread with the new number and tap either New Contact or Add to Existing.

View your Contact’s Profile
Just like your desktop app, you can view your contact’s profile on your iOS device, including any G Suite or Office 365 integrations.

Just tap on your contact’s name when you’re in a chat to pull up their profile. If you haven’t connected these integrations on your desktop app first, then this area will appear blank.
Dialpad Tip:
When a contact has multiple #s, tap on the star next to the # you want to make their primary contact option.
Caller IDs
Adjust your caller ID for a specific caller or for all calls.
To adjust your caller ID for a specific call, you can select one of the following options:
- Long press on the call icon when you’re in a conversation thread
- Tap on your name in the upper left-hand corner of the app>Settings>Outbound Caller ID
- Tap on New Call From drop-down when you’re viewing the New Call screen

To adjust your caller ID for all calls, you’ll need to navigate to your global caller ID settings.
Keep in mind that any interactions with your Department lines will default to the Department ID.
Block a Caller
Blocking a call on your iOS works the same way as your desktop app.

Toggle DND
- Tap on your photo/initials at the top left of your screen
- Tap on the DND toggle to turn it ON

Set a Custom Status
Just like your desktop app, you can set a custom status straight from your iOS. Just tap into your profile to see the option to pick from our defaults or create your own (and why not throw an emoji in there?).

Check your Inbox
Just like your desktop app, your Inbox displays:
- New notifications
- New calls
- Missed calls
- Voicemails
- Recordings

Tap on a voicemail to display options to:
- Play (via earpiece of speaker)
- Reply (conversation thread)
- Call Back
- Delete
Pro or Enterprise user? Voicemail transcriptions will automatically appear under each of your voicemails.
Archive a Thread
Just like your desktop app, you can Archive past conversations in your Recent list. Just swipe left and tap X to Archive.

Bonus: Swiping right gives you the option to place a call to that contact.
Messaging
Send a Message
- Tap + then New Message
- Type your contact’s name or number
- Once you’re pulled into the thread, start typing your message
- Tap on the camera icon to upload an image or video

You’ll have the option to upload three photos to send via Dialpad. Don’t forget, you can share photos from your native gallery straight to Dialpad.
Just select Dialpad from your share options and then either select a frequent contact or search for one of your Dialpad contacts.

Receive a Message
You’ll receive a banner notification on your screen, a badge notification on the app’s icon, and a notification within the app—in other words, we got your back.

Plus when you have multiple messages, we’ll give you the option to dismiss all in a single tap (talk about productive).
Dialpad Tip:
Did you know you can flag a message for later? Long press on a message to flag for later, then navigate to Inbox > Flagged.
Group Messages
Need to grab the attention of the group? On your new message screen, tap after your recipient’s name to add more contacts.
Once you’ve started your conversation, you can tap on the Profile within the conversation thread to view individual group members, add another contact to your group, leave the group, or mute notifications.

Tap on any individual group member to pull up options like:
- View Profile
- Send Message
- Call
- Remove From Group
iPhone Settings
Not only is your outbound caller ID and HD Calling options nestled under your Settings, but also the ability to adjust the type of notifications you receive as well as how you receive them.

Receive Notifications For
By default, these options are toggled ON, but you can always opt to turn one or all three off.
Advanced Settings: SMS Forwarding & Ring this Device
By default, this is turned off to avoid having you receive notifications twice (once from the app and once from your native device).
SMS Forwarding is only available with carrier service. By default, Ring this Device is toggled ON to ensure that you’re receiving incoming calls to your forwarding device. If you want, you can opt to turn this off so only calls to your other connected devices ring.
Keep in mind that this is not the same thing as enabling Do Not Disturb from your profile drop-down.